Building a Free Temporary Email Service with Cloudflare Workers
Project repo: GitHub - cf-tempmail
Try it live: tempemail.mrwuliu.top
Before You Start: What You'll Need
If you'd like to follow along, here's roughly what you'll need:
A Cloudflare account — Free sign-up is all you need. This entire project runs on Cloudflare's free tier (Workers, KV, Email Routing).
Your own domain name — You'll need to point your domain's DNS to Cloudflare, since Email Routing requires MX records configured on Cloudflare DNS. Don't have one? Grab a cheap domain (a .top domain costs a few bucks per year).
Node.js and npm — For installing and running Wrangler (Cloudflare's Workers CLI tool). Node.js 18+ recommended.
Rust toolchain (optional) — If you also want to use the CLI client, install Rust with:
curl --proto '=https' --tlsv1.2 -sSf https://sh.rustup.rs | shA GitHub account (optional) — For the automated deployment setup described later.
That's all — no credit card, no server needed. Let's dive in.
Why I Built This
One day, I just wanted to sign up for a website I'd never visit again. So I handed over my real email address. Within hours, my inbox was drowning in marketing spam.
We've all been there, right? That's when I decided to build my own throwaway email service — burn after reading, zero traces.
The goals were clear:
Zero cost — leverage Cloudflare's generous free tiers
Fast — Workers edge computing, low latency worldwide
CLI-first — because terminal folks deserve to check emails in style too
Architecture Overview
Before writing any code, let's map out the data flow:
Someone sends an email → Cloudflare Email Routing → Worker receives & parses → Store in KV
                                                                                      ↓
User visits web / CLI polls ← Worker reads KV ← Returns email list
Three core components:
Cloudflare Workers — acts as both API server and email handler
Cloudflare KV — serves as the database (yes, using KV as a database)
Rust CLI — for terminal users
The project is a monorepo: worker/ for the backend, cli/ for the Rust client.
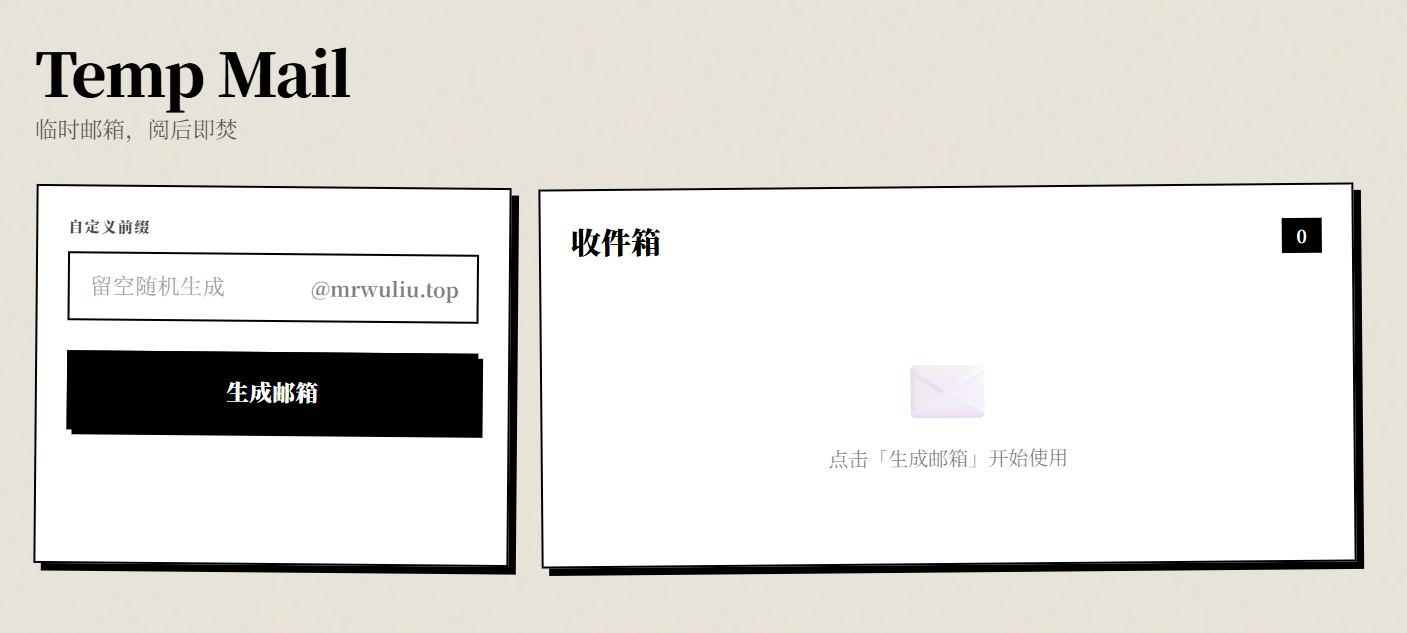
Here's what the UI looks like when it's all done:
Step 1: Making the Worker Receive Emails
Cloudflare's Email Routing is a game-changer — it forwards every email sent to *@yourdomain.com to your Worker for processing, completely free.
In wrangler.toml, configure your domain and KV binding:
name = "temp-email"
[vars]
EXPIRE_HOURS = "24"

[[kv_namespaces]]
binding = "ALIAS_CACHE"
id = "your-kv-namespace-id"
Then set up the Email Routing Catch-all rule in the Cloudflare Dashboard to forward all emails to the Worker.
The Worker needs to implement two interfaces: fetch (HTTP requests) and email (incoming emails). The email() method receives the raw MIME data.
Step 2: Hand-Rolling a MIME Parser
This was the most "interesting" part of the project (read: excruciatingly painful).
Raw email comes in MIME format, looking something like this:
From: sender@example.com
Subject: =?UTF-8?B?5L2g5aW9?=
Content-Type: text/plain; charset=utf-8
Content-Transfer-Encoding: quoted-printable

=E4=BD=A0=E5=A5=BD=E4=B8=96=E7=95=8C
Chinese characters get encoded as =?UTF-8?B?...?=, and the body uses quoted-printable encoding. I had to hand-write:
quoted-printable decoder — converting
=E4=BD=A0back to UTF-8UTF-8 encoded words decoder — handling
=?UTF-8?B?base64?=in email headersHTML stripper — extracting plain text when someone sends an HTML email
No email parsing libraries — just regex and string manipulation. The code is ugly, but it works.
Step 3: Designing the KV Storage Scheme
Cloudflare KV has an annoying limitation: list() only supports prefix-based lookups, and consistency isn't guaranteed. For an email service that needs to "list all emails for a given alias," using KV directly is painful.
The solution: maintain an index.
email_ids:alice123        → ["id1", "id2", "id3"]   // Index: all email IDs for an alias
email:alice123:id1        → {from, subject, body...} // Individual email content
Every time a new email arrives, append the ID to the index array, then store the email content. When reading, fetch the index first, then retrieve each email individually. It costs an extra KV read, but the logic is clean and completely sidesteps the quirks of list().
Each email also has a 24-hour TTL — spam auto-evaporates. Eco-friendly and worry-free.
Step 4: Signature-Based Stateless Authentication
A temporary email service doesn't need sign-ups, but random strangers shouldn't be able to read your mail either. I went with a dead-simple signature scheme:
signature = base64(alias + ":" + expireAt + ":" + secretKey)When generating an alias, the server returns the signature to the client. On every subsequent request, the client includes this signature. The server verifies by recalculating the signature and comparing, while also checking the expiry.
Stateless, no database sessions needed, auto-expiring — a perfect fit for a throwaway email service.
Step 5: Building a Pretty UI
The frontend lives right inside the Worker — worker.js contains an entire HTML page, about 400 lines of inline HTML + Tailwind CSS.
For the design, I went with Neo-Brutalism:
Thick black borders
border-2 border-blackPaper-textured background
Slightly rotated elements
rotate(-1deg)Bold color blocks
It looks like sticky notes pinned to kraft paper — a handcrafted, artisanal vibe.
Feature-wise:
One-click temporary email generation
Auto-refreshing inbox every 5 seconds
Browser notifications for new emails
One-click email address copy
Alias deletion
The favicon is an inline SVG of a little pink flower, because... why can't it be cute?
Step 6: A Rust CLI — For the Terminal Romantics
A web-only temp email service? Not enough. So I built a CLI client in Rust.
$ cf-tempmail new
✨ Your temp email is ready: random-words@mrwuliu.top
📬 Signature saved to config file

$ cf-tempmail list
📬 Inbox (2 emails)
┌──────────────────────────┬──────────────────────────────┐
│ Sender                   │ Subject                      │
├──────────────────────────┼──────────────────────────────┤
│ noreply@github.com       │ [GitHub] Verify your email   │
│ hello@some-service.com   │ Welcome to Some Service!     │
└──────────────────────────┴──────────────────────────────┘

$ cf-tempmail listen
⏳ Listening for new emails... (Ctrl+C to quit)
📧 New email from noreply@example.com: Your code is 123456
Tech stack:
clap 4 — CLI argument parsing (derive mode, declarative and ergonomic)
reqwest + rustls — HTTP client (pure Rust TLS, no OpenSSL dependency)
colored — terminal color output
textwrap — automatic text wrapping and alignment
Config is stored at ~/.config/cf-tempmail/config.toml, persisting the alias and signature for reuse.
The entire CLI is just three files, roughly 340 lines of code — lean and mean.
Step 7: Automated Deployment
The final step: CI/CD for the Worker. In .github/workflows/deploy.yml:
on:
  push:
    branches: [main]
jobs:
  deploy:
    runs-on: ubuntu-latest
    steps:
      - uses: actions/checkout@v4
      - uses: cloudflare/wrangler-action@v3
        with:
          apiToken: ${{ secrets.CLOUDFLARE_API_TOKEN }}
Push to main, and it deploys to Cloudflare automatically. Make your changes, git push, done.
The Final Tally
Component | Technology | Cost |
|---|---|---|
API Server | Cloudflare Workers | Free |
Database | Cloudflare KV | Free |
Email Receiving | Cloudflare Email Routing | Free |
Frontend | Inline HTML + Tailwind | Free |
CLI Client | Rust | Compile once, run anywhere |
Total cost: $0/month
Visit tempemail.mrwuliu.top to try it now, or install the CLI:
cargo install cf-tempmail-cliAnd that's the whole story — building a fully functional temporary email service from scratch, powered entirely by Cloudflare's free tier. The most fun part was hand-rolling the MIME parser and designing the Neo-Brutalist UI. The most painful part was also hand-rolling the MIME parser.
If you want to build your own, fork my repo, swap in your domain, and you're good to go. Enjoy!
Login to Comment
You need to log in to leave a comment.
Login